Enigma_wiring_kleur.svg

Licensing
| Description |
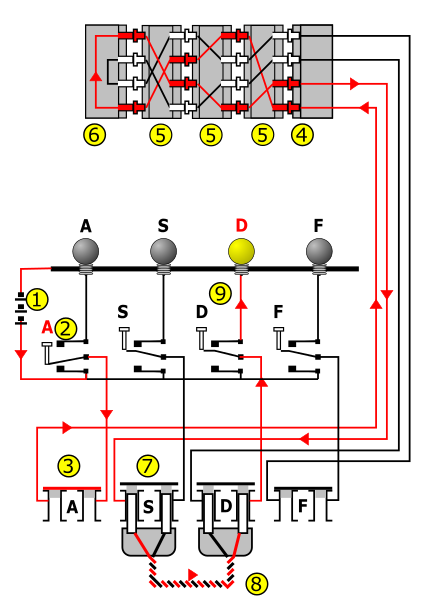
To explain the Enigma, we use this wiring diagram. To simplify the example, only four components of each are shown. In reality, there are 26 lamps, keys, plugs and wirings inside the rotors. The current flows from the battery (1) through the depressed bi-directional letter-switch (2) to the plugboard (3). The plugboard allows rewiring the connections between keyboard (2) and fixed entry wheel (4). Next, the current proceeds through the—unused, so closed—plug (3) via the entry wheel (4) through the wirings of the three (Wehrmacht Enigma) or four (Kriegsmarine M4 or Abwehr variant) rotors (5) and enters the reflector (6). The reflector returns the current, via a different path, back through the rotors (5) and entry wheel (4), and proceeds through plug 'S' connected with a cable (8) to plug 'D', and another bi-directional switch (9) to light-up the lamp. Copied from Wikipedia:Enigma machine |
||||||||
| Date | |||||||||
| Source | Own work ( Original text : own work by HandigeHarry based on previous version based on File:Enigma wiring kleur.png by User:Matt Crypto originally Afbeelding:Enigma_wiring_kleur.png by User:Drdefcom ) | ||||||||
| Author | MesserWoland | ||||||||
|
Permission
( Reusing this file ) |
MesserWoland
, the copyright holder of this work, hereby publishes it under the following licenses:
This file is licensed under the
Creative Commons
Attribution-Share Alike 2.5 Generic
license.
Attribution:
MesserWoland
You may select the license of your choice.
|
||||||||
| Other versions | Derivative works of this file: Enigma wiring kleur.jpg | ||||||||
| SVG development |
This W3C-
invalid
diagram was created with an unknown SVG tool.
This diagram uses
embedded
text that can be
easily translated
using a text editor.
|
